2 Factor Auth App - Part 1 ReactJS Tutorial
- Yuri Falcão
- Nov 2, 2023
- 4 min read
Today we will get introduced to Web Applications Security basic with the implementation of one API that we have used before: Twilio. One of the most common parts of any application is the user Registration and the Login. For those, simple concepts like filtering inputs (to avoid things like SQL Injection) and cryptography are very well known and implemented. But what has been becoming a trend among large corporations and many websites is the use of 2 Factor Authentication. It has been more and more common as a way to fight back the growing number of hackers getting information and credentials of employees (check out this case). There are many ready to use solutions available but they cost more and require basically the same effort to implement in your server. Since Program Coffee's Web Developer (yes, the one and only Yuri), has been implementing this for a couple of clients, nothing better than strip the code down and create a nice instructive tutorial (this first part will be mainly the ReactJS Tutorial).
Since the logic is quite big: we have Frontend, Server, Twilio Setup, Database, Input Filtering and finally Cloud, I decided to make it in parts that are easier for you and me.
So let's get started!
The stack we will be using is the famous MERN. our ReactJS front end will be the starting point with a simple but very technical interface.
To manage the page, which will be a single page with different inputs (states), we will use React Hooks and States to manage our Buttons and Input Fields.
So, to start, we will open VS Code and install react by running the command: npx create-react-app react-auth-app
This will create that simple React app structure where we can start. Now on the app.js (react-auth-app/src/app.js) we will start by deleting all the existing sample code! Now we can start OUR app.js:
Since we will be changing our UI with states (of the buttons) let's import useState, and also let's import /App.css since we will be having some styling applied to our buttons.
Now the logic of our UI will be as follows:
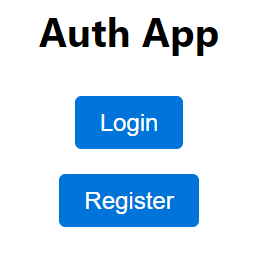
A first page displaying the "Login" and "Register" buttons:
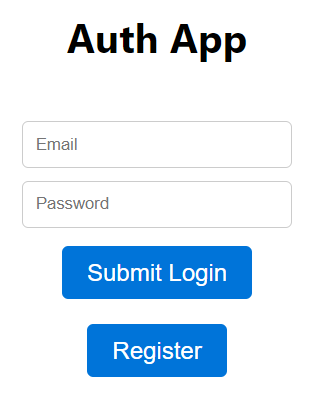
Once we click on the login, it will display the input fields "email" and "password" as well as the "Submit Login" button:
Then the same logic applies when we hit the "Register" button:
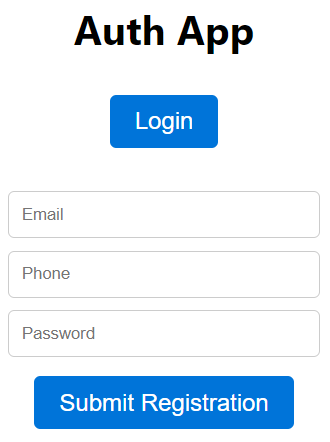
Notice we also added the "Phone" field as it will be used to send the Twilio SMS message for our 2 Factor Authentication.
With this mockup in mind lets start coding!
The first step is to declare variables for our states and set them, so we will create a variable "showLogin" and "showRegistration" as our two states that will carry our inputs and buttons for both menus. Following this logic These two states will also carry their inputs: email, password for "showLogin" and newEmail, newPhone and newPassword for "showRegistration" and the states of these will also be important. So let's declare everything:
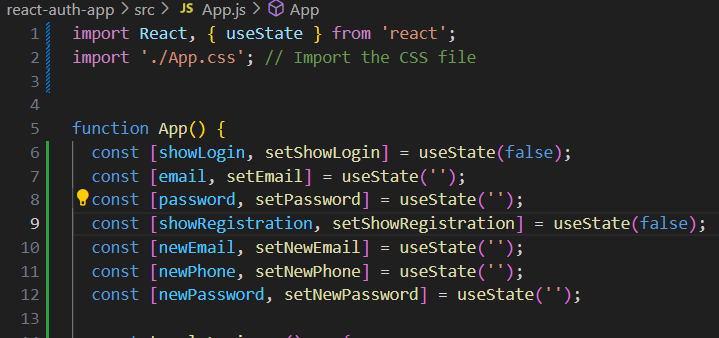
As you can imagine, since the app starts without showing any input, we set our default states to 'false' and leave the inputs with empty states (they will be changed directly when we change the buttons' states.
Now the second part is to create the functions that will change the states of "showLogin" and "showRegistration", where the logic is simple, it is a function that when called will change (or set) the state to the contrary:
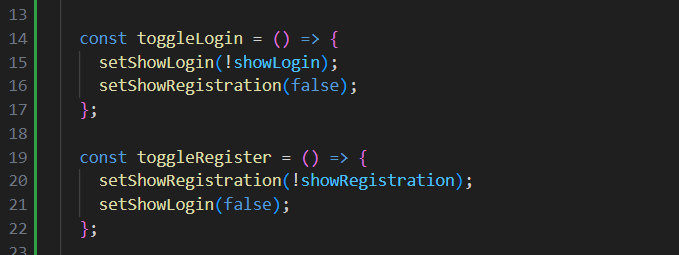
Now, for our code to be ready to be implemented with the backend, let's also create event handlers that will also manage the state of our inputs (these will be taken care once we start implementing the NodeJS portion):

Now, let's go for the main part: the logic and the UI components.
The first step is to check if "showLogin" is True, if so, then it will display it's inputs. else it will only show the "Login" and "Register" buttons (these will be calling the "toggleLogin" and "toggleRegister" functions beforementioned), and the same logic is applied to "showRegistration".
One thing to keep in mind is that once the input is filled and the user hits "Submit" it needs to call a function, that in our case is "handleLoginSubmit" and "handleRegisterSubmit".
So the Login part will be this:
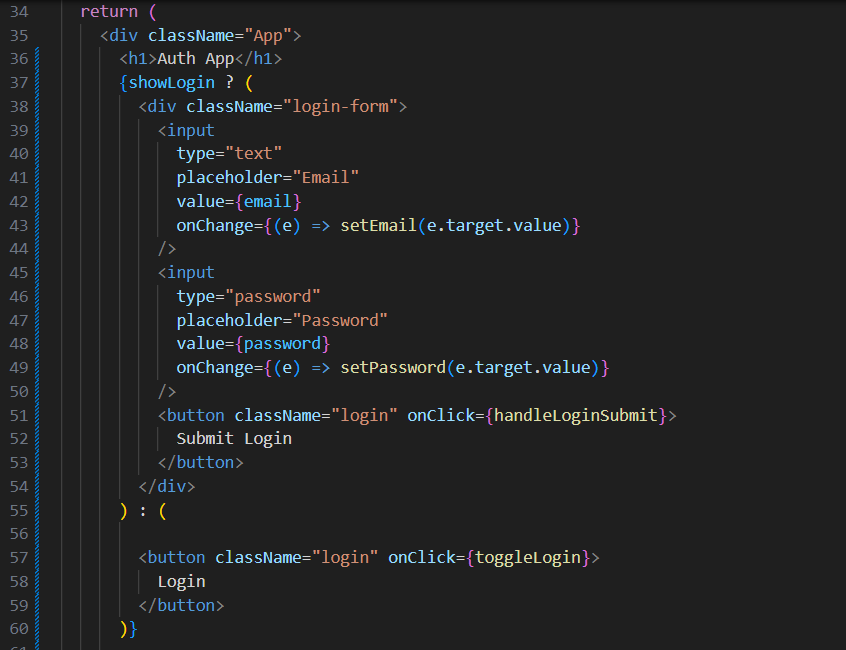
And, following the same logic, the Register part is this:
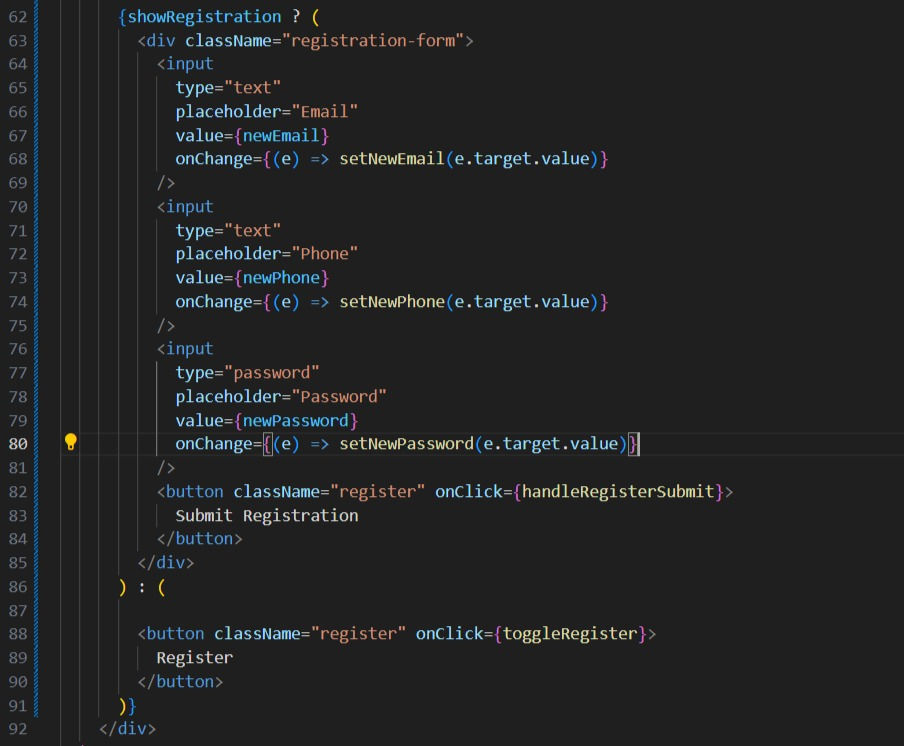
So, it is easy to identify and read the code to understand the functionality (and this is the beauty of ReactJS, allowing for making simple and compact yet very resourceful applications).
The program will run with the "showLogin" and "showRegistration" set to false, therefore, only the last part of the HTML code for each part (the buttons with className "login" and "register" will be displayed. Once the user press the "Login" button, it will call the "toggleLogin" function, that will set the state of "showLogin" to True, and will then run the first part of the HTML code, displaying the input fields for out user.
And that is a wrap! We could, by implementing some logic and simple concepts of React states and hooks, create a lightweight simple and direct UI that allow our users to navigate through 3 different "interfaces" in the same page (all with less than 100 lines of code!!! \o/). What is next: The next step will be dedicated to setting up our NodeJS backend. We will use a range of implementations, including Routes, Axios and Cors. And we will be implementing Mongoose and Twilio in our code. (If we have time and space I will go through all the input filtering and hashing and encryption of passwords to make a very complete program. Note that we have some great ready libraries and code examples for user management with MERN, one of these is this one. Next week we shall have our update. Thank you and see you soon! Yuri Falcao.


Comments